AI Room Design From Photo: Redesign Any Room in Minutes
Learn how AI room design from a photo works, how to write a useful brief, and how to turn a generated redesign into a practical room decision.
By AI Room Design Editorial Team
AI room design from photo is the fastest way to see a different direction for a real space. Instead of describing an imaginary room from scratch, you upload the room you already have and ask an AI system to change the furniture, colors, materials, lighting, or decoration while keeping the main context visible.
That context is what makes photo redesign useful. A blank prompt can produce a beautiful room, but it may not answer your real question. You may need to know whether a lighter sofa works with the existing floor, whether a darker wall makes a narrow room feel too closed, or whether a calmer bedroom palette will still leave enough storage. A photo gives the design model a starting point and gives you a reference for judging the result.
The best results come from treating the output as a design conversation, not a final construction document. Upload a clear image, state what must remain, change one or two variables at a time, and compare the result with real measurements. For a working layout, continue into an AI room planner. For a broader style exploration, start with AI Room Design.
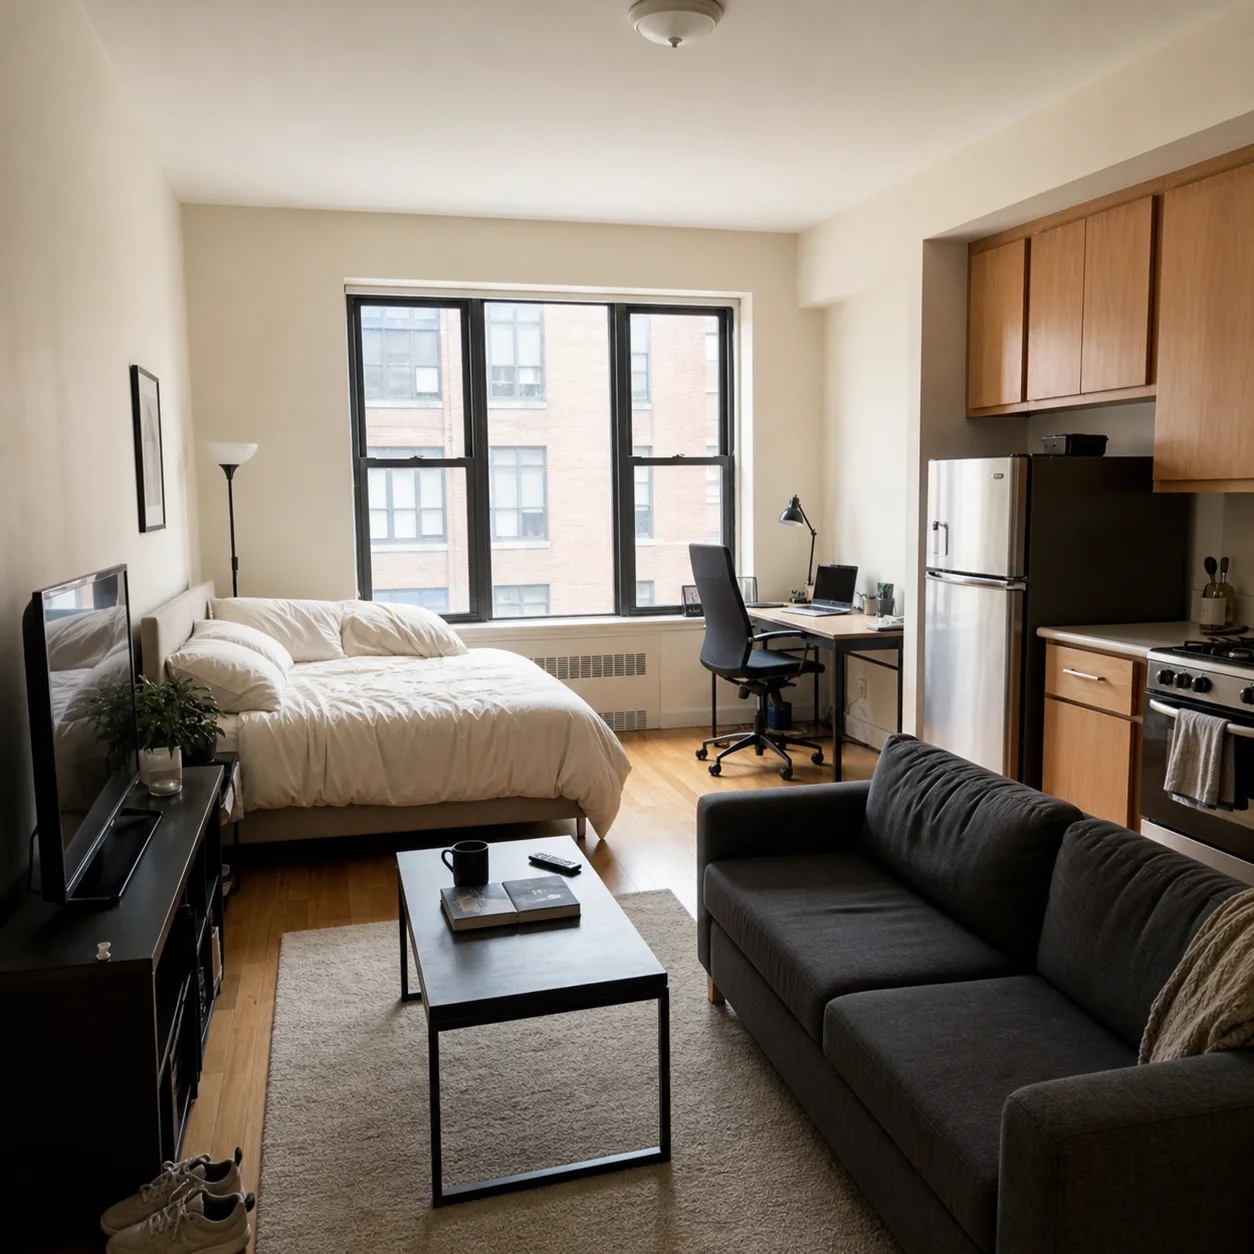
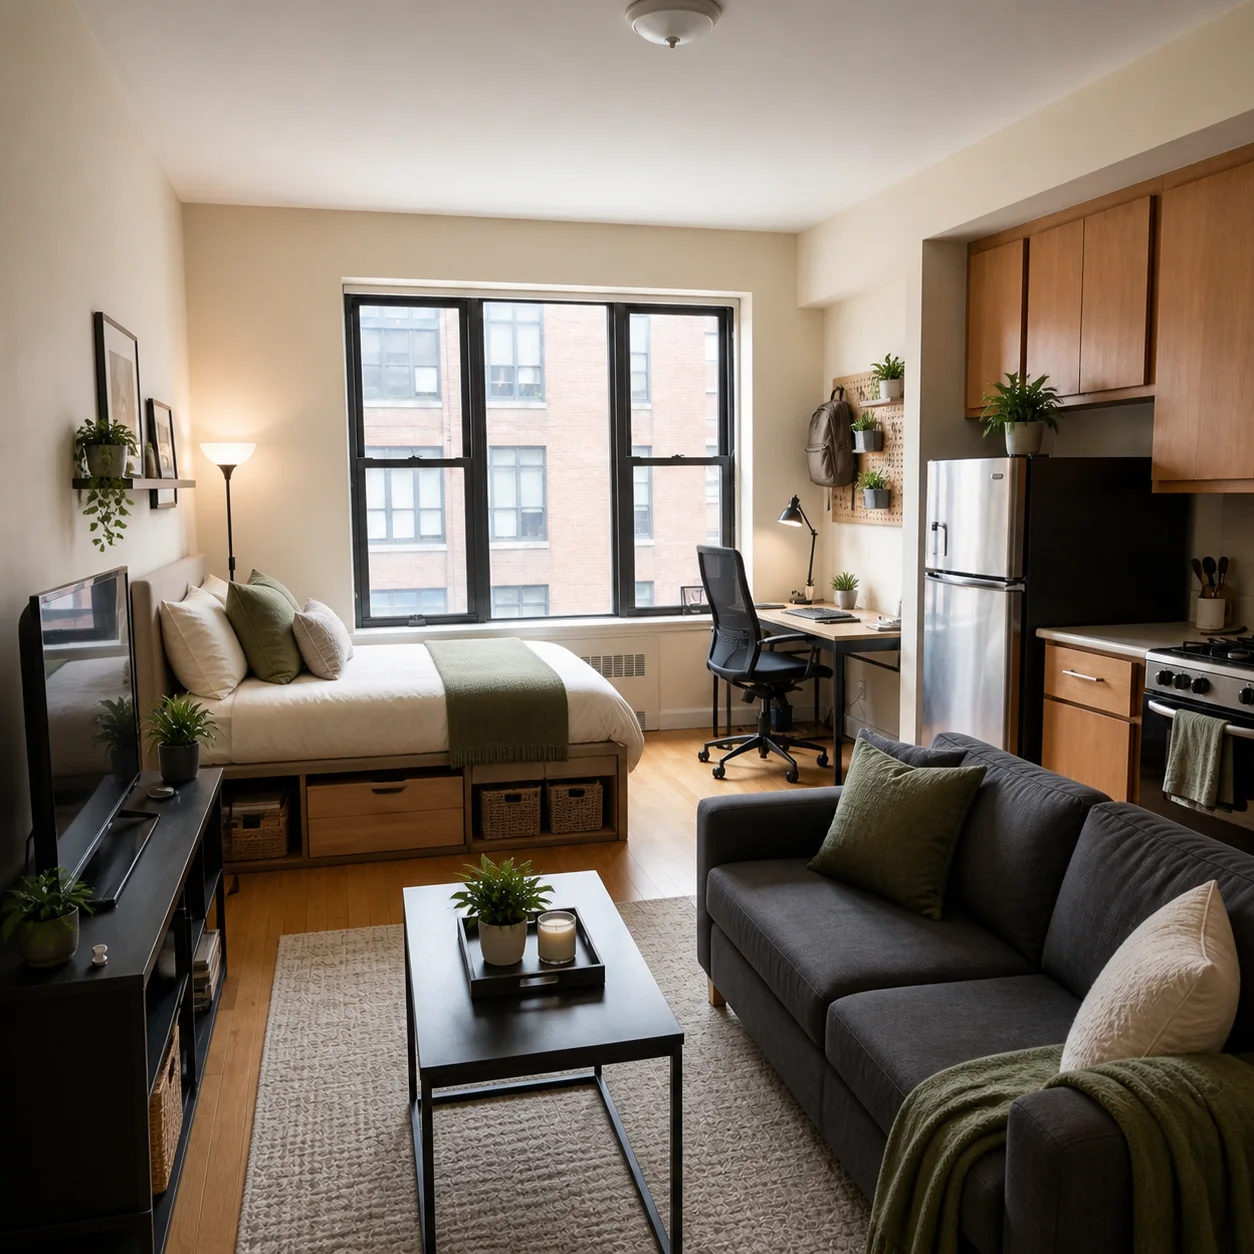
The before-and-after pair shows the right way to read a generated design: as a visual hypothesis. It can suggest a palette, furniture relationship, and atmosphere. It cannot verify a wall measurement, electrical route, structural condition, or code requirement.
What Is AI Room Design From Photo?
AI room design from photo is an image-to-image workflow for interiors. The system receives a room photograph and a text or style instruction. It analyzes visible geometry and visual cues, then synthesizes a new image that attempts to preserve some parts of the original while changing others.
Depending on the product, the workflow may offer room types such as living room, bedroom, kitchen, bathroom, office, or dining room. It may also provide style presets such as modern, Scandinavian, Japandi, industrial, coastal, minimalist, or luxury. A more controllable tool lets you combine a preset with a written brief.
There are three different kinds of “from photo” results:
- Redesign. The room structure and viewpoint are intended to remain recognizable while the appearance changes.
- Staging. Furniture and decor are added to an empty or sparsely furnished room, often for presentation or real estate marketing.
- Replacement. The original room is used as a loose visual reference, but the generated scene may change the architecture or point of view.
These categories are easy to confuse. If you want to keep the position of a window, use redesign language and state the constraint. If you are preparing an empty listing, a virtual staging workflow may be more appropriate. If you want to test a new room concept without preserving the actual space, a text-to-image generator may be sufficient.
How AI Photo Redesign Works
The model does not “measure your room” in the same way a surveyor or floor-plan application does. It detects patterns in the image and predicts what a plausible redesigned room could look like. That is why the prompt and the input photo both matter.
The process usually includes these stages:
1. The image is analyzed
The system identifies broad visual features such as floor, ceiling, walls, furniture, openings, light direction, and perspective. Occlusion makes this difficult. A sofa can hide a wall outlet, a plant can hide a corner, and a mirror can confuse the apparent depth of the room.
2. The design intent is interpreted
Your style selection and written prompt tell the model which changes matter. “Make it modern” leaves a large range of possibilities. “Keep the oak floor, replace the bulky coffee table with a round low table, and use warm white walls with linen curtains” gives the model a narrower target.
3. A new image is synthesized
The output is assembled from learned visual relationships. It is not a product catalog and should not be assumed to contain real, purchasable items. The system may improve composition while quietly changing scale, material behavior, or structure.
4. You compare and refine
The useful work begins after the first output. Mark what improved, what drifted, and what is still wrong. Ask for a new version that changes fewer things. A sequence of controlled iterations is easier to judge than ten unrelated styles.
Step 1: Upload a Photo
Your upload should make the room easy to read. Use a level camera position, include the floor and ceiling line when possible, and avoid extreme wide-angle distortion. Natural daylight is usually easier to interpret than a room lit by one small colored lamp.
Before uploading, remove temporary items that are not part of the decision: shopping bags, laundry, loose packaging, or people who will not appear in the finished design. Keep fixed items that matter, including radiators, built-in cabinets, wall-mounted screens, and structural columns. If something must stay, the system needs to see it.
A good photo checklist:
- Take the photo from a corner or doorway at roughly eye level.
- Keep vertical lines as straight as possible.
- Include the full wall that contains a window or door.
- Avoid covering the floor with a close foreground object.
- Use one main photo and add a second angle when the layout is ambiguous.
- Crop out faces, addresses, documents, and personal details that are not needed.
If your photo hides half the room, do not expect the output to know what is behind the camera. State uncertainty in the prompt and treat any unseen area as unverified.
Step 2: Choose the Room Type
Room type is more than a label. It tells the workflow which furniture and functional relationships deserve attention. A bedroom prompt should prioritize the bed, bedside access, wardrobes, blackout options, and calm lighting. A kitchen prompt should prioritize work zones, appliances, storage, and surfaces that can be cleaned. A bathroom prompt should prioritize wet areas, vanity storage, mirrors, and ventilation.
Choose the most specific room type available. If the same room is both a living area and a home office, say that in the prompt. Ask the model to preserve two zones rather than letting it fill the whole space with one category of furniture.
Step 3: Select an Interior Style
Style presets are useful for creating a consistent starting point, but they are not complete design briefs. Japandi, for example, may suggest warm wood, restrained color, natural texture, and low visual clutter. It does not decide how much storage you need, whether you prefer a firm sofa, or how to handle a north-facing room.
Pair the style with three concrete choices:
- A material, such as oak, terrazzo, brushed metal, linen, or zellige tile.
- A palette, such as warm white, muted olive, clay, charcoal, or pale blue.
- A functional priority, such as storage, reading light, open circulation, or a flexible desk.
This combination makes the result easier to compare. If one version changes the style, material, and layout at the same time, you will not know which decision helped.
Step 4: Generate Multiple Designs
Generate a small set of variants rather than one image and a large set of random alternatives. Three controlled options are usually more useful than fifteen unrelated images:
- Keep the layout, change the palette.
- Keep the palette, change the furniture style.
- Keep both, change the lighting and decoration.
Save the original image next to each output. Name the files by the decision they represent, such as warm-oak-light-walls or dark-accent-reading-corner. This simple habit prevents the visual comparison from becoming a pile of anonymous renders.
Use the following prompt structure when the first result changes too much:
Redesign the attached existing [room type] from the same camera viewpoint. Preserve the room envelope, walls, windows, doors, ceiling height, floor, and fixed built-ins. Change only [specific changes]. Use [style], [palette], and [materials]. Keep realistic furniture scale, clear walking paths, access to storage, and natural light from the existing openings. Do not invent windows, doors, walls, or extra rooms. No people, no text, no logos.
Notice that the prompt says what to preserve before it describes the style. That order helps keep the design anchored to the image.
Best Tips for a More Useful Result
Describe constraints before adjectives
“Keep the window wall clear for curtains and preserve the existing wood floor” is more useful than adding another style adjective. Constraints tell the model what not to reinterpret.
Name the problem you want to solve
Say “create a clear path from the entry to the balcony” or “add closed storage without blocking the radiator.” A design request becomes more actionable when it describes a problem rather than only a look.
Change one variable at a time
If you change furniture, wall color, lighting, and layout together, the result may look better but you cannot explain why. Controlled variations make the AI useful for decision-making.
Use realistic material language
Name surfaces and maintenance needs: matte paint, sealed oak, washable linen, porcelain tile, low-pile rug, or easy-clean upholstery. Material words help the result move beyond a generic mood board.
Use a second tool when accuracy matters
Photo redesign is not a substitute for an editable plan. Move the promising concept into a room planner to test furniture width, walking paths, door swings, and zones. This two-stage workflow is faster than trying to force one image model to solve every problem.
Keep a decision log
Write one sentence under each image: “This option works because the sofa faces the window and the entry path stays open.” A short note keeps the project focused on outcomes rather than novelty.
Common Mistakes
Uploading a distorted photo
Phone wide-angle modes can stretch the corners and make a small room look deeper than it is. The model may preserve the distortion or use it as a false cue. Use a normal lens when possible and take a second image from another position.
Asking for a total transformation
“Turn this into a luxury hotel” often invites the model to invent architecture and oversized furniture. If you want a real redesign, say what must remain and ask for a targeted change.
Treating generated furniture as a product recommendation
AI output may combine an attractive shape with impossible dimensions or a material that does not exist in that form. Use it to define a shopping brief, then find real products and compare their specifications.
Ignoring use and maintenance
An all-white room may photograph beautifully but fail for pets, children, cooking, or a high-traffic entry. Add the user behavior that the room must support.
Forgetting privacy
Do not upload photos that reveal personal documents, faces, valuables, or identifying views when they are not necessary. Check the current privacy and retention policy of the service before using personal interiors.
Using AI for technical approval
AI images do not prove that a wall can be removed, a circuit can support an appliance, a shower is waterproof, or a furniture passage meets accessibility requirements. Use professionals and measured documentation for those decisions.
Before-and-After Review Checklist
When a result looks promising, review it in this order:
- Architecture: Are the walls, openings, ceiling, floor, and fixed items still correct?
- Movement: Can someone enter, sit, open storage, and reach the next room?
- Scale: Are the sofa, bed, island, desk, and rug proportionate to the room?
- Light: Does the proposed palette make sense for the real window direction and artificial lighting?
- Storage: Is the room more useful, or did decoration replace practical capacity?
- Maintenance: Do the materials suit how the room will actually be used?
- Budget: Which ideas are affordable now, and which need a later phase?
This review turns a visually convincing result into a more reliable design conversation. It also makes it easier to explain the concept to a partner, decorator, or contractor.
When to Use a Different Workflow
Use AI Room Design when your main question is visual: “What would this room look like with a calmer palette?” Use virtual staging when the room is empty and the goal is presentation. Use the bedroom design generator when sleep, storage, and bedside lighting are the main concern. Use the AI room planner when a layout must be edited and measured.
If you are still learning the category, read Best AI Room Design Tools for a workflow comparison and AI Interior Design: Complete Beginner's Guide for a broader explanation of strengths and limitations.
FAQ
Can I redesign a room from one photo?
Yes. One clear photo is enough for an initial visual direction. It is not enough to verify every wall, opening, measurement, or storage condition. Add a second angle or a measured plan when the decision depends on information hidden from the camera.
What kind of photo works best for AI room design?
A level, well-lit photo with visible walls, floor, ceiling line, windows, and doors works best. Avoid extreme wide-angle distortion and temporary clutter. Keep fixed objects that matter to the redesign.
How do I stop AI from changing my room layout?
Write explicit preservation instructions: keep the same viewpoint, walls, windows, doors, floor, and fixed furniture. Ask for one change at a time. If the output still drifts, use an editable planner for layout and the photo tool for visual finishes.
Is room redesign AI free?
Some products offer a free preview or limited credits, but allowances, watermarks, exports, and privacy terms vary. Confirm the current terms before uploading sensitive photos or using an output for commercial work.
Can I use a photo redesign for a renovation quote?
Use it as a concept reference, not as a quote-ready specification. A contractor needs verified dimensions, product selections, quantities, site conditions, and technical requirements. The AI image can help you communicate the desired appearance.
Should I use a room photo or a floor plan?
Use a room photo for visual context and a floor plan for measured layout. When both matter, use a hybrid workflow: photo redesign for style, then a room planner for placement and circulation.
How many variations should I generate?
Start with two or three controlled variations. Generate more only after you can explain what each new version is testing. A small, labeled set is easier to decide between than a large collection of unrelated renders.
A Simple Decision Matrix
When several photo redesigns look good, compare them with the same questions instead of choosing the most dramatic image:
| Question | Option A | Option B | What to verify |
|---|---|---|---|
| Does the architecture match? | Walls, openings, floor, ceiling | ||
| Does the room support the main activity? | Seating, sleep, work, cooking, or storage | ||
| Is circulation clear? | Entry, passage, doors, drawers, and windows | ||
| Are the materials realistic? | Moisture, cleaning, durability, and cost | ||
| Can the idea be phased? | What can change now versus later |
This matrix is deliberately plain. It turns a subjective visual response into a small record of reasoning. A concept can be beautiful and still lose because it blocks a door, depends on a material you cannot maintain, or requires a structural change that was never part of the project.
From a Generated Image to a Useful Brief
After you choose a direction, rewrite the image in words. Describe the room that exists, the parts that stay, the changes that are desired, and the decisions that remain open. For example: “Keep the original flooring and window. Use warm white walls, a compact sofa, a round table, closed storage, and a clear balcony path. Confirm the sofa depth and storage width before purchase.”
This written brief is more durable than the image alone. It can travel to a room planner, a product search, a designer, or a contractor. It also makes a second AI iteration more controlled because you can change one sentence instead of starting from a blank prompt.
If you are redesigning several rooms, keep a shared list of decisions: the wood tone, the metal finish, the base wall color, and the lighting temperature. A consistent vocabulary helps the home feel connected without forcing every room into the same style. Keep each room's function separate so the kitchen, bedroom, and living room do not become interchangeable renders.
Final Takeaway
A Note on Before-and-After Comparisons
Place the original and generated image side by side at the same size. Do not judge the redesign from the after image alone. Look for structure drift, changed perspective, missing storage, and objects that became smaller. Then ask which part of the image you actually want to carry into the room. It may be the wall color, the lighting, the sofa silhouette, or the way a rug defines a zone rather than the entire scene.
This habit also helps when sharing concepts with someone else. Label the image as a visual direction, add the date and prompt, and list the items that still need measurement. The more clearly you label the uncertainty, the more useful the image becomes in a real decision.
AI room design from photo works best when you give the model a clear starting room and a narrow decision to solve. Upload a readable photo, name the room, preserve the architecture, choose one style direction, and describe the functional improvement you want. Use the generated image to compare possibilities, then verify scale, circulation, materials, and technical details outside the image model.
The goal is not to make the AI invent a perfect home. The goal is to see a better option early enough to make a confident, practical next decision.
Practical Example: From Photo to Decision
Imagine a living room with a fixed balcony door, a sofa that must stay for now, and a narrow path to the kitchen. The first prompt should preserve those facts and test only the wall color, rug, lighting, and storage. After comparing two outputs, you might keep the warmer palette but reject the larger coffee table. The next step is not another style; it is measuring a table that leaves the path open. That is how photo redesign becomes a practical sequence instead of an endless gallery.