AI Interior Design: Complete Beginner's Guide (2026)
A practical beginner's guide to AI interior design, including benefits, limits, tool selection, prompts, workflows, and when to hire a professional.
By AI Room Design Editorial Team
AI interior design helps you turn a vague idea into a room concept you can see, compare, and discuss. You can upload a room photo, describe a style, test a new palette, or sketch a furniture arrangement before buying anything. That makes the technology useful for homeowners, renters, students, real-estate teams, and designers who want faster visual exploration.
It is also easy to misunderstand. An AI image can look finished while changing the room's proportions, hiding a structural issue, or showing furniture that would not fit through the door. The best way to use interior design AI is to give it a clear job. Let it help with visual decisions, options, and communication. Use measurements, product specifications, and qualified professionals for decisions that affect safety, cost, structure, or code.
This guide explains what AI interior design is, what it can and cannot do, which workflow to choose, how to write prompts, and how to judge a result. If you want to start with an existing room photo, try AI Room Design. If you want a measured layout, use the AI room planner after you establish the room envelope.
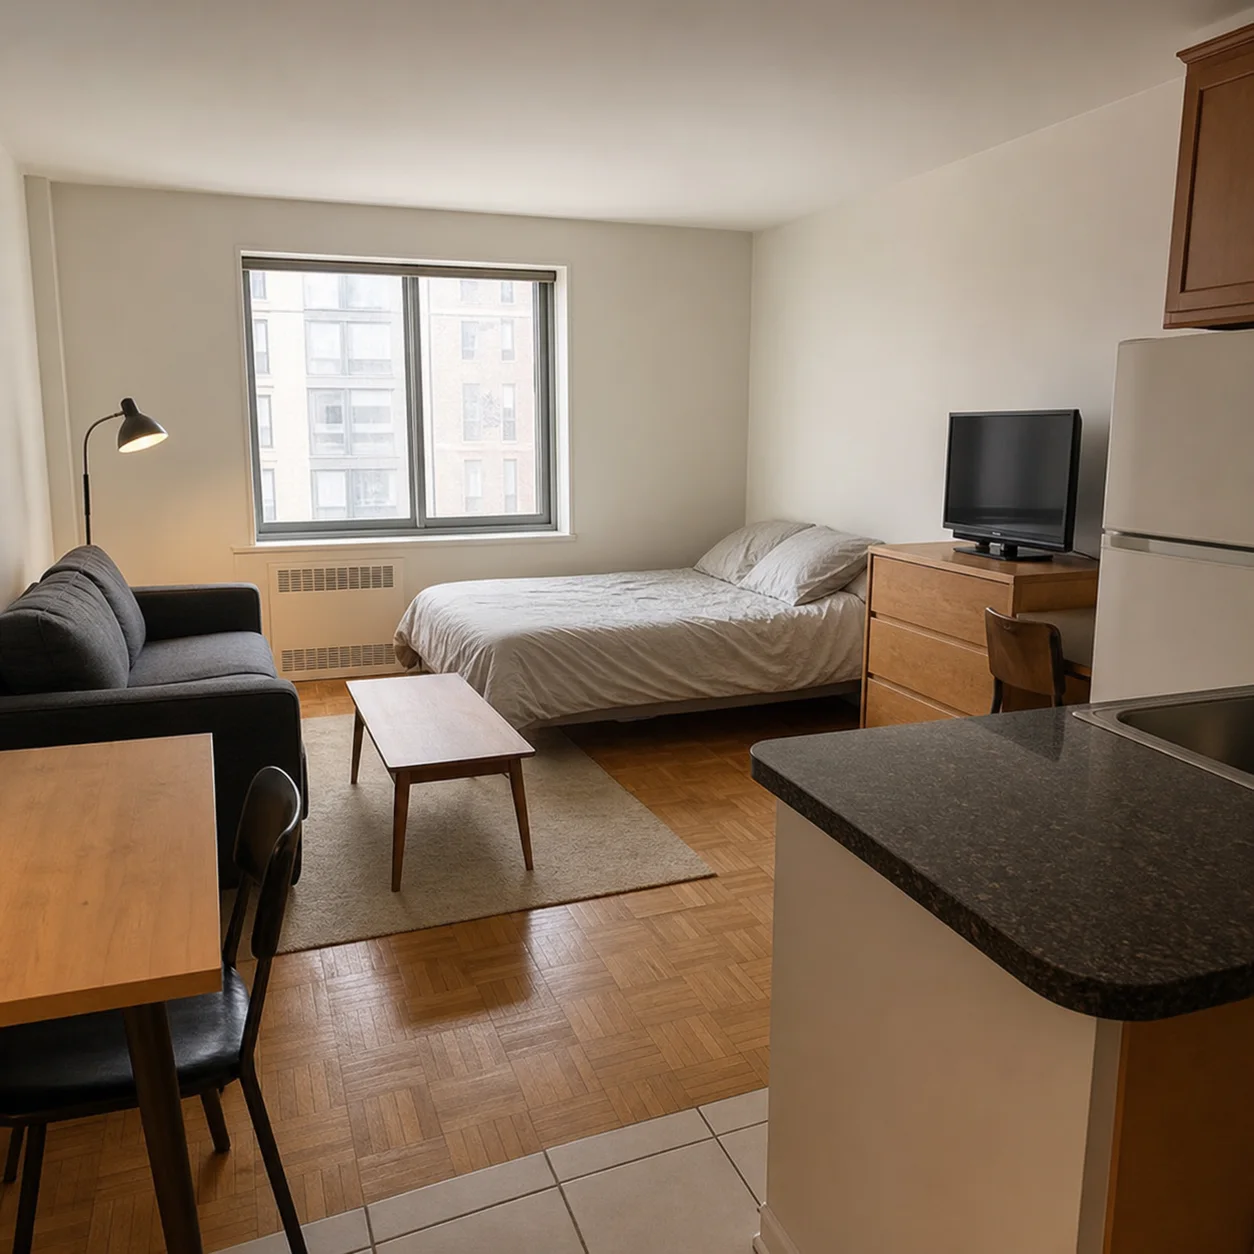
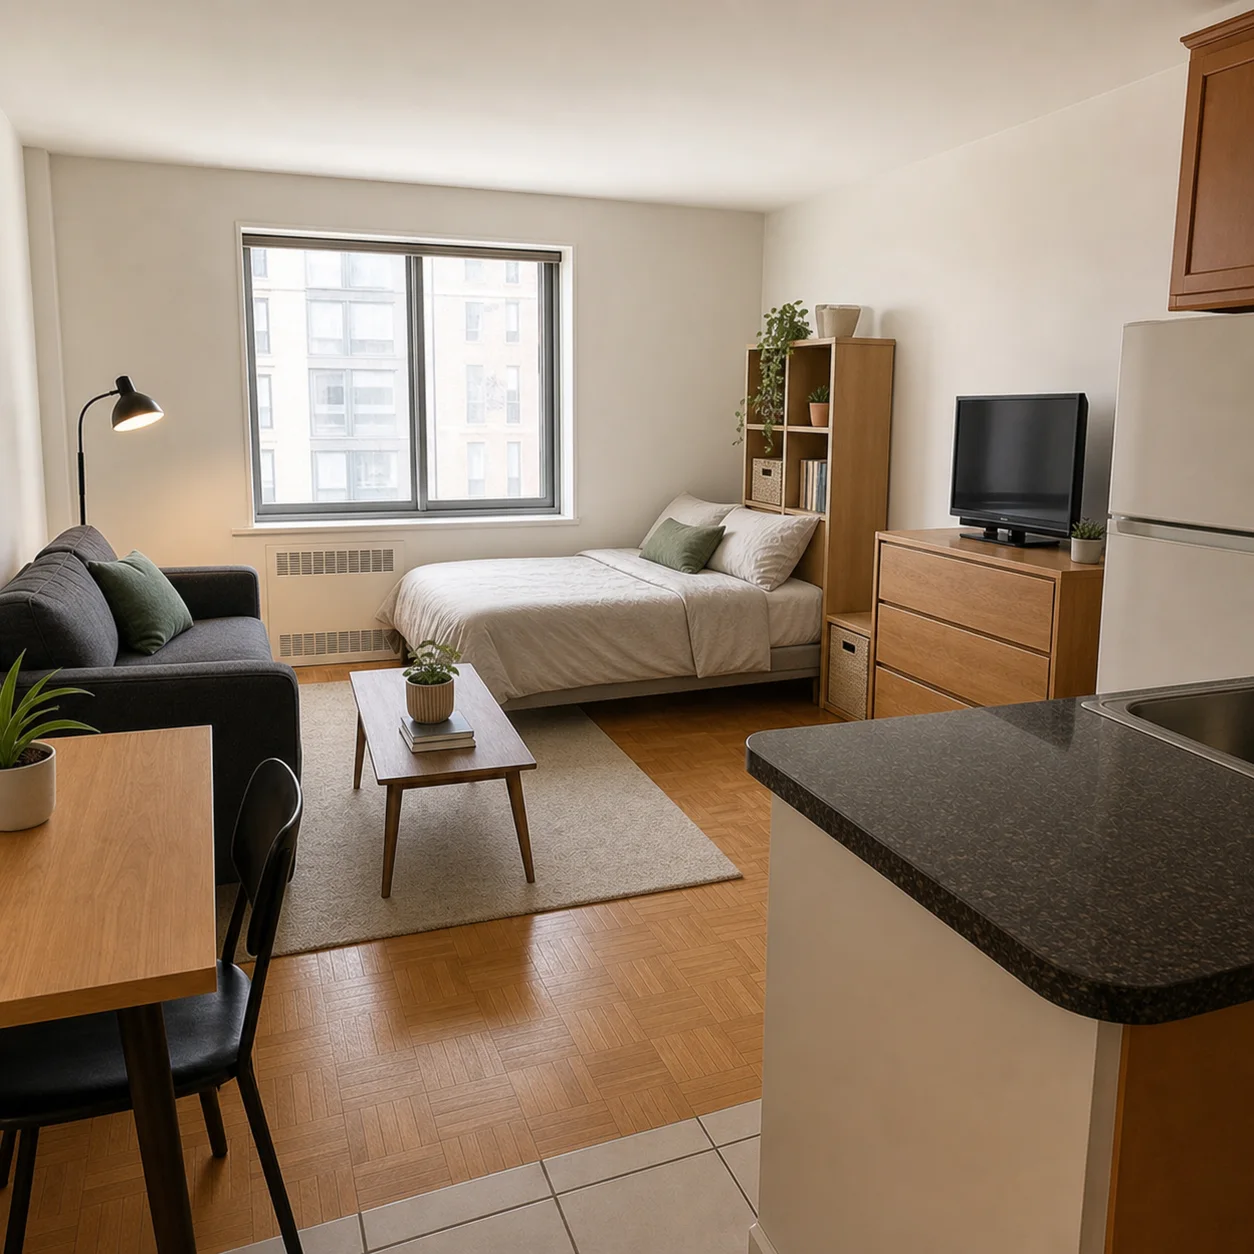
The visual pair is an example of concept communication. It is not a measured survey or a construction drawing.
What Is AI Interior Design?
AI interior design is the use of generative and computer-vision systems to explore interior spaces. The system can process images, text, plans, style references, or product information and return a visual or spatial suggestion.
The phrase covers several different workflows:
- Photo redesign: change the appearance of an existing room while keeping its visible context.
- Text-to-room visualization: create a room from a written brief when you do not have a suitable photo.
- Floor-plan and 3D planning: place furniture and zones in an editable spatial model.
- Virtual staging: add furniture and decor to an empty property image.
- Material visualization: compare cabinet, wall, tile, flooring, or lighting directions.
- Prompt assistance: turn a short idea into a more complete design brief.
These workflows overlap, but they solve different questions. A generated image answers “What might this look like?” A planner answers “Will this layout work?” A material visualizer answers “Which surface direction fits the room?” A professional drawing answers “How should this be built?” Good AI interior design starts by choosing the right question.
How AI Interior Design Works
Most systems follow a simple loop even when the interface looks sophisticated:
- You provide an input such as a photo, prompt, or plan.
- The model identifies visual and semantic patterns.
- It combines those patterns with your instructions.
- It produces one or more concepts.
- You review the concepts and refine the brief.
The model does not reason about a room exactly as an interior designer, building surveyor, or contractor does. It predicts a plausible output from visual patterns. It may understand that a sofa belongs in a living room while failing to preserve the distance needed to open a cabinet. It may produce a believable stone counter while ignoring the exact appliance depth.
That difference explains why a strong workflow alternates between AI exploration and human verification. Use the model to widen the option set, then narrow it with measurements, habits, budget, and technical requirements.
Benefits of Interior Design AI
Faster visual exploration
It takes less time to compare a warm, cool, dark, or light direction than to imagine each option from a written description. A quick set of concepts can reveal which path deserves deeper work.
Better conversations
Partners often disagree because they imagine the same word differently. “Modern,” “cozy,” or “luxury” can mean very different things. A visual concept gives the conversation something concrete to react to.
Lower cost of early experimentation
Before paying for samples, delivery, or a full design package, you can test whether a broad direction feels right. This does not eliminate professional work; it helps you enter that work with clearer priorities.
More accessible starting points
People who are not trained in design can describe a room in everyday language and receive a visual prompt to refine. A beginner does not need to know the name of every style before exploring.
Useful variations
AI can produce controlled alternatives: keep the layout but change the palette, keep the palette but change the seating, or keep the furniture but adjust lighting. This is valuable when a decision has several plausible answers.
Limitations of AI Interior Design
It can change structure
Doors, windows, beams, radiators, stair openings, and built-ins may move or disappear. The more dramatic the prompt, the more carefully you need to compare the output with the original space.
It can misjudge scale
An image model may make a small room look generous by shrinking furniture or increasing camera perspective. A chair that looks correct in the image can still block a path in real life.
It cannot verify technical conditions
It does not know the condition of the wall, the capacity of an electrical circuit, the ventilation route, the waterproofing details, or the structural load. Those decisions need documentation and professional review.
It can invent products
Generated furniture is often a visual blend rather than a real SKU. Use the shape, color, and material as a shopping brief. Do not assume the exact item can be purchased or installed.
It can reflect biased training data
AI outputs may repeatedly favor large homes, expensive materials, neutral palettes, or a narrow idea of “good taste.” Add your location, budget, accessibility needs, climate, maintenance preferences, and household habits to broaden the brief.
It may handle privacy differently
Uploaded photos can reveal personal information. Review the current privacy, retention, deletion, and training terms before you use a personal interior image.
Choosing the Right AI Interior Design Workflow
Use this quick decision guide:
| Your starting point | Best first workflow | Next step |
|---|---|---|
| You have a photo and want a new look | Photo redesign | Check the layout and measure promising ideas |
| You have dimensions and a furniture problem | Room planner | Add style and material concepts |
| You need a listing to feel furnished | Virtual staging | Keep marketing and technical claims separate |
| You know the mood but not the room | Text visualization | Compare against a real or measured space later |
| You are comparing materials | Image redesign or visualizer | Confirm real samples and maintenance |
| You need a buildable solution | Professional design workflow | Use AI only as a communication aid |
For a real room, start with AI Room Design, then use AI Room Makeover if the structure works and you only need a styling refresh. For planning, use AI Room Planner. This separation protects you from asking a photo generator to solve a measurement problem.
A Beginner Workflow That Works
Step 1: Define the decision
Write one sentence: “I need to decide whether this room should feel warmer without replacing the floor.” Or: “I need two furniture layouts for a living room that also works as a reading space.” One decision keeps the prompt focused.
Step 2: Record the constraints
List doors, windows, radiators, built-ins, outlets, plumbing points, fixed furniture, and anything that cannot move. Add approximate dimensions when you know them. Record who uses the room, what activities happen there, and what maintenance level is realistic.
Step 3: Capture the input
Take a clear photo or create a basic plan. Avoid distortion and include enough context to understand the room. If a single image hides the layout, use a second angle.
Step 4: Choose a narrow design direction
Pick one style direction and three supporting decisions: palette, materials, and functional priority. Do not combine five unrelated styles in the first prompt.
Step 5: Generate a small set
Create two or three controlled options. Save each with the original input and a note about what changed.
Step 6: Review against reality
Check structure, movement, scale, light, storage, maintenance, and budget. If the concept fails a basic constraint, reject it regardless of how polished it looks.
Step 7: Move from image to plan
Use a room planner or measured drawing for the option that survives the first review. Confirm furniture dimensions and technical decisions outside the AI image.
How to Write an AI Interior Design Prompt
A useful prompt has an order. Begin with the room and the preservation rules. Then state the functional goal, style, palette, materials, lighting, and output quality. Finish with exclusions.
Create a photorealistic concept for this existing [room type]. Preserve the walls, windows, doors, ceiling height, floor, fixed cabinets, and camera viewpoint. Solve [specific functional problem] for [who uses the room]. Use a [style] direction with [palette], [materials], and [lighting]. Keep furniture at a realistic scale, preserve circulation, and show practical storage. Do not invent architectural openings, change the room type, add text, add people, or use impossible furniture.
The word “preserve” is not magic, but it communicates the difference between redesign and replacement. The more important the constraint, the more directly you should name it and check the output afterward.
AI Interior Design vs. an Interior Designer
AI and professional designers are not interchangeable. AI is fast at generating visual alternatives and combining style language. A designer brings site observation, spatial judgment, procurement knowledge, coordination, experience with materials, and responsibility for a project brief.
Choose professional help when the project includes structural change, plumbing or electrical work, code questions, accessibility requirements, a complex renovation, a high budget, or a decision that would be expensive to reverse. You can still bring AI concepts to that conversation. They can help explain the atmosphere and priorities you want, as long as you label them as concepts.
For a small refresh, a homeowner may use AI to explore colors and furniture, then check dimensions independently. For a full remodel, the AI image should be treated like an early mood board. It can make the conversation more efficient, but it does not transfer responsibility for technical decisions to the model.
Best Use Cases
Living rooms
Use AI to compare sofa relationships, TV-wall treatments, rugs, lighting layers, and reading corners. Keep a clear route between entries and adjacent rooms.
Bedrooms
Use it to explore calm palettes, bed-wall treatments, wardrobe fronts, curtains, bedside lighting, and storage. State the bed size and door swing.
Kitchens
Use it for cabinets, counters, backsplash, handles, pendants, and color. Verify appliance openings, work zones, ventilation, and services with a professional.
Bathrooms
Use it to compare tile patterns, vanity colors, mirrors, shower screens, and lighting. Verify wet-area construction, clearances, and ventilation.
Rental apartments
Use it for reversible changes: rugs, lighting, removable wallpaper, freestanding storage, art, and textiles. State what cannot be drilled, painted, or replaced.
Home offices
Use it to test desk orientation, shelving, background composition, task lighting, and video-call framing. Keep screen glare and ergonomic dimensions in view.
Reviewing an AI Concept Like a Designer
Do not ask only “Do I like it?” Ask what the image is claiming. Does it show a room that can be used every day? Does the furniture support the actual activity? Are the materials appropriate for moisture, pets, children, cooking, or high traffic? Is the light direction plausible? Is there enough storage?
Use a two-column note:
| Keep exploring | Verify or reject |
|---|---|
| Palette, texture, furniture silhouette | Dimensions and clearances |
| Lighting mood | Electrical and ventilation |
| Artwork and accessory direction | Product availability and price |
| Overall atmosphere | Structural and code implications |
This makes AI more valuable because it separates creative inspiration from evidence that still needs checking.
Related Reading and Tools
Read AI room design from a photo if you want a detailed upload-and-refine process. Read Best AI Room Design Tools when you are comparing photo, planner, kitchen, bedroom, and staging workflows. Use AI Interior Design Generator when you want to explore a text-led room concept, and move to a photo workflow once you have a real space to test.
FAQ
Is AI interior design worth using?
It is worthwhile when it helps you compare a decision earlier and communicate the result more clearly. It is less useful when you expect a single image to provide accurate measurements, construction details, or a complete shopping list.
Can AI interior design replace a designer?
No. It can support visual exploration and briefing, but it does not replace site assessment, technical coordination, procurement, or professional responsibility. The more consequential the project, the more important that distinction becomes.
What should I include in an AI interior design brief?
Include the room type, what must stay, the functional problem, the style, three material or palette choices, lighting, users, and exclusions. Add dimensions when they are known and avoid asking for too many unrelated changes at once.
How do I make AI interior design look less generic?
Use a real photo, preserve specific architecture, name real materials, describe the people and activities in the room, and state one practical goal. Replace broad adjectives with observable details such as “open path to the balcony” or “closed storage below the media wall.”
Can AI design a whole home?
It can generate separate room concepts, but consistency is harder than producing one attractive image. Define a shared palette and material language, then review each room for its own function. Use a measured plan for relationships between rooms.
Can I use an AI interior design result with a contractor?
Yes, as a visual reference with clear labels that it is conceptual. Pair it with measurements, product selections, drawings, and technical notes. Do not present the generated image as proof of a buildable solution.
What is the safest first project for a beginner?
Start with a reversible room refresh: palette, textiles, lighting, art, and freestanding furniture. Avoid using AI alone to make structural, electrical, plumbing, waterproofing, or accessibility decisions.
A Reality Check Before You Commit
Before you paint, order, or demolish, compare the AI concept with a short evidence list:
| Decision | Evidence needed beyond the image |
|---|---|
| Furniture | Actual width, depth, height, delivery path, and operating space |
| Paint and color | Real sample under daylight and evening light |
| Flooring and tile | Product performance, installation, maintenance, and batch variation |
| Lighting | Fixture data, wiring, glare, controls, and local safety requirements |
| Storage | Inventory of real objects, internal dimensions, and access |
| Structural or service change | Site review, drawings, approvals, and qualified advice |
This check protects the useful part of AI from its most misleading quality: visual confidence. A polished picture can make an uncertain assumption feel settled. Keep the picture, but write down what is still unknown.
Building a Consistent Home Concept
If you are working across several rooms, do not copy one generated image into every prompt. Create a small design system instead. Choose one or two recurring wood tones, a base wall family, a metal finish, and a lighting mood. Then let each room respond to its activity. A bedroom may be quieter, a kitchen more durable, and a living room more social while still sharing the same underlying language.
Use the same review sequence for each room: architecture, movement, storage, light, maintenance, budget, then style. This makes a whole-home concept easier to discuss and reveals contradictions early. For example, a dark palette may work in the living room but need more reflected light in a narrow hallway or bathroom.
Final Takeaway
A Responsible AI Design Brief
Keep a short record for every project: the source photo or plan, the date, the tool, the prompt, the fixed conditions, and the decisions still requiring verification. If the image is shared with a partner or professional, label it as a concept and distinguish generated furniture from selected products.
This record improves continuity. A second iteration can preserve the decisions that already work instead of changing the room again. It also protects the project from a common failure mode: a confident image quietly becoming an assumed specification. The brief makes clear which parts are creative, which are measured, and which need expert review.
AI interior design is most valuable when it makes uncertainty visible early. Use it to compare alternatives, then spend human attention on the choices that matter most to comfort, safety, cost, and long-term use.
The same principle applies when the result is disappointing. Do not immediately add more style words. Ask what information was missing. If the AI changed a window, improve the image and preservation rule. If it ignored the household, add the routine. If the layout is wrong, add measurements or change tools. Each failure is evidence about the next iteration, not a reason to make the prompt longer without a diagnosis.
Keep the Human Decision Visible
At the end of an AI design session, record three things: what the tool helped you see, what you rejected, and what still needs proof. This can be as short as “the warm wall color works; the larger sofa fails the path; measure the existing cabinet before choosing a replacement.” The record turns a stream of images into a design process.
It also helps prevent false certainty when a concept is shared. A client, partner, or contractor should be able to tell which parts are visual intent and which parts are verified. Clear labels make the AI output more useful, not less persuasive, because everyone knows what decision the image is meant to support.
AI interior design is most useful when it makes your next human decision easier. Use it to see options, communicate a mood, compare materials, and create a clearer brief. Keep the actual room and the people who use it at the center, and let measurements, product data, and professionals settle questions that an image cannot prove.
For a practical starting point, upload a real room to AI Room Design, compare a few controlled concepts, then verify the best direction in an AI room planner. That sequence gives you the speed of AI without confusing visual inspiration with buildable design.
A Small First Experiment
If you are unsure where to begin, choose one reversible change. Photograph the room, preserve the fixed elements, and generate three versions that change only the palette and lighting. Write one sentence about what works in each. This small experiment teaches you how the system responds to your room and gives you a concrete brief for the next step. It also limits the cost of being wrong, which is exactly where AI interior design is most useful.